
Walkthrough: Checking 1 Token from Start to Finish (DOPE)
In lessons 2.1 to 2.14 you learned each check one at a time. Now let's put them all into practice on one real token: DOPE, from the metrics card to the 's history, following the lesson 2.14 checklist order.
DOPE's : 33jENUQnjoitkMFpvNJcSHyLAHFWJuHwT6E3E8CNpump. Always match the CA, not just the name (lesson 1.7).
Our conclusion: the contract is clean, but the risk is medium/high on the distribution side. If you still want in, here's how to weigh it:

Step 1: Header + Metrics Card
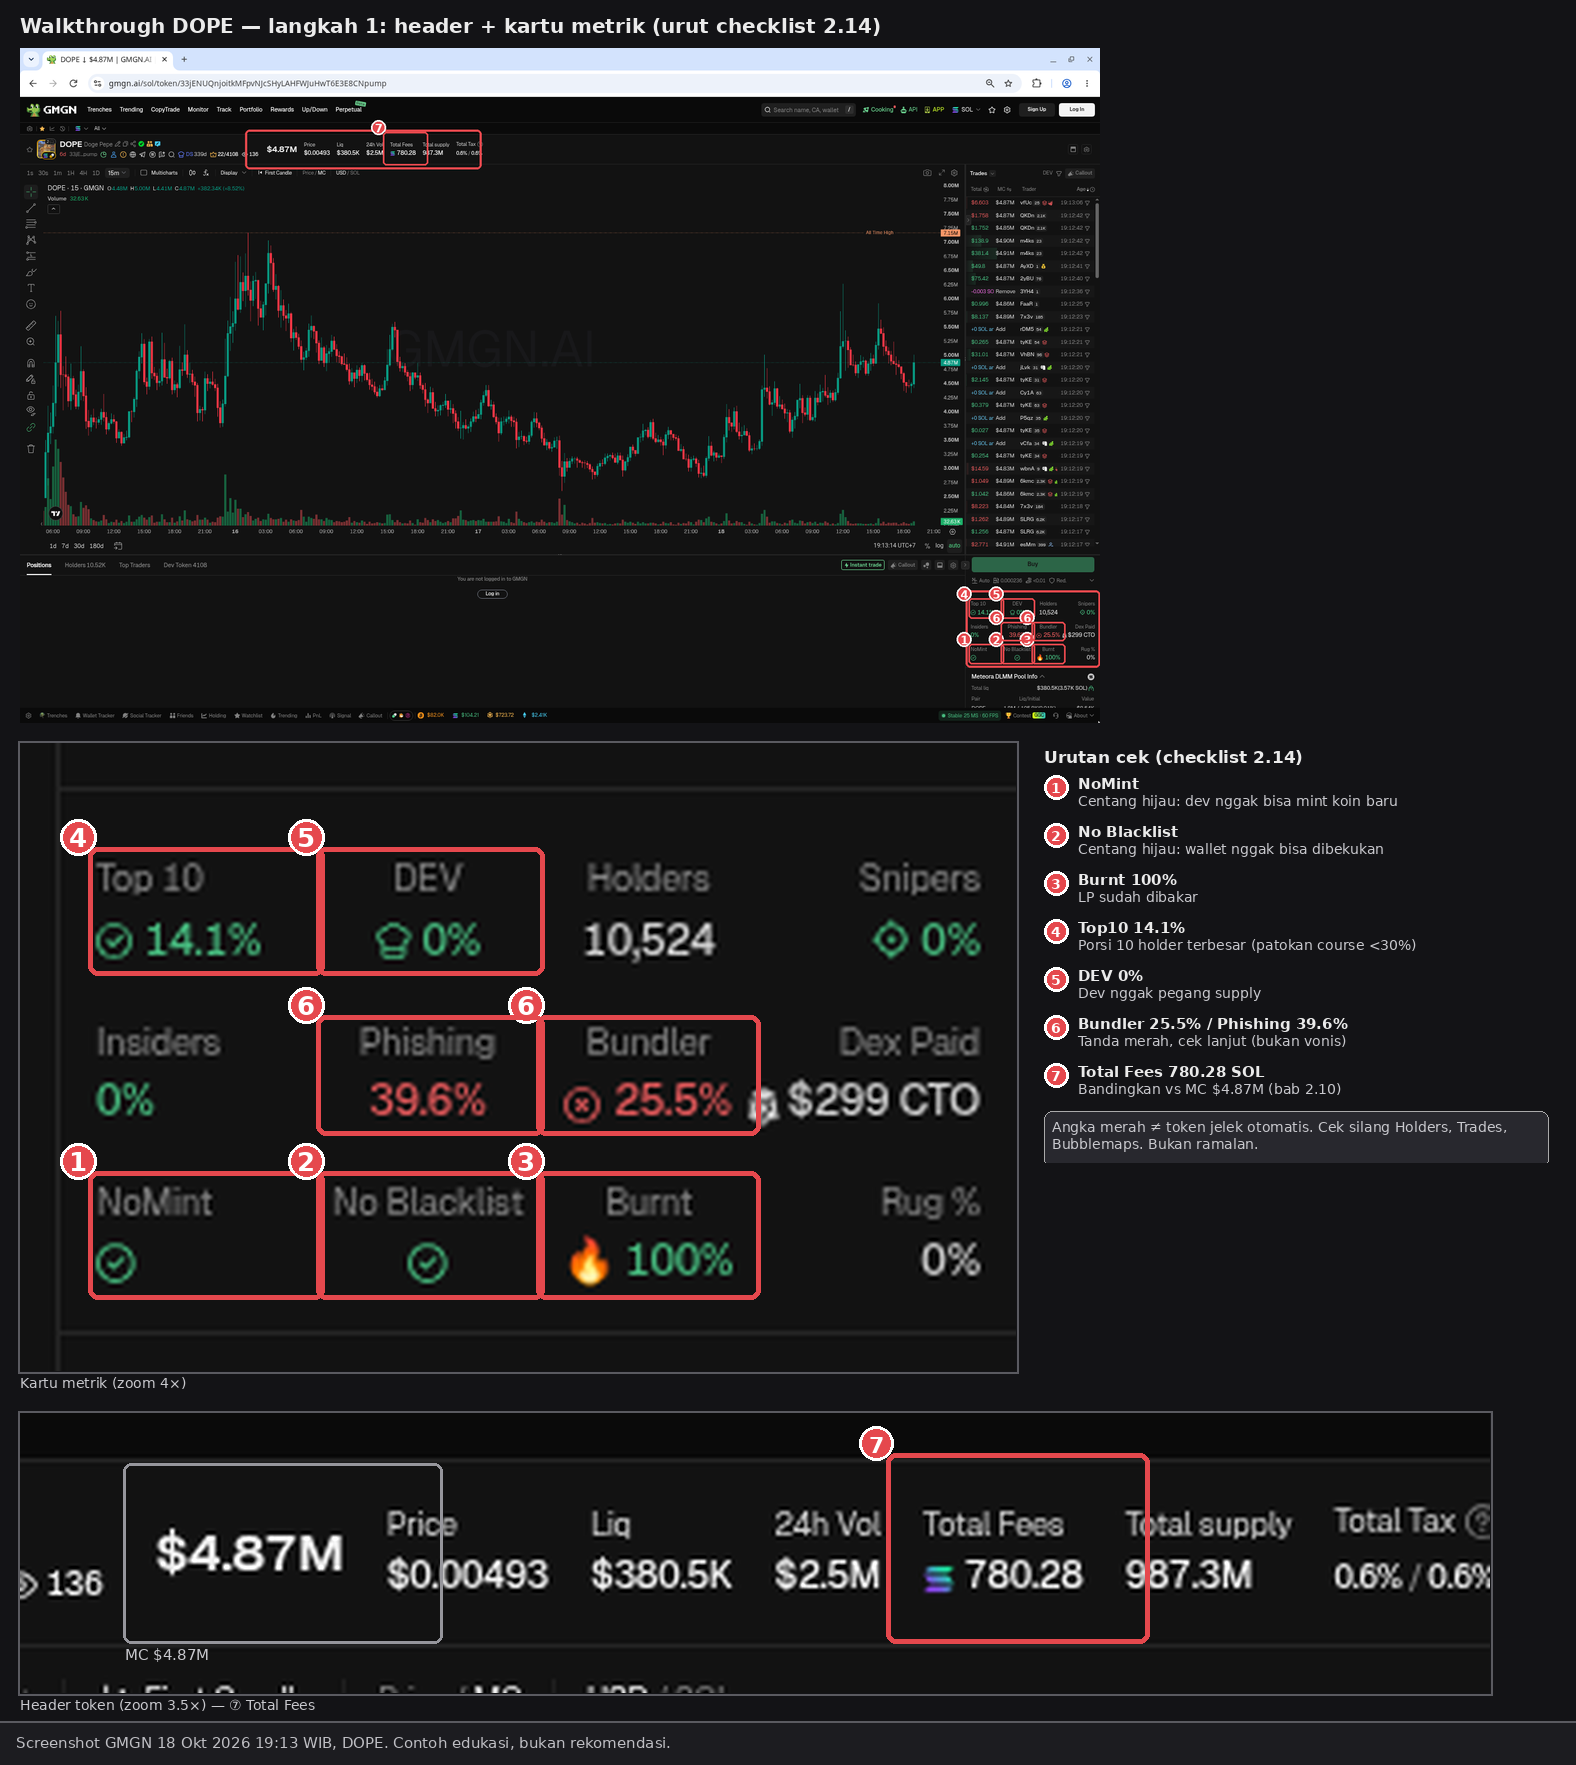
- Contract safety (lessons 2.1 to 2.3): ① NoMint green check, ② No Blacklist green check, ③ Burnt 100%.
- Distribution (lessons 2.4, 2.5): ④ Top 10 14.1% (below the course's 30% guide), ⑤ DEV 0%. and are 0% too.
- Red signs (lessons 2.8, 2.13): ⑥ Bundler 25.5% and 39.6%. These two numbers are why we need to dig deeper.
- (lesson 2.10): ⑦ Total Fees 780.28 SOL with an MC of $4.87M. The 1:10,000 guide: $4.87M ÷ 10,000 ≈ 487 SOL. The fee is above the guide, so on this side it looks reasonable.
- Other data at the time of checking: about 10,524 , $299 (, lesson 2.11), 0%, Liq $380.5K.
Step 2: Holders Tab
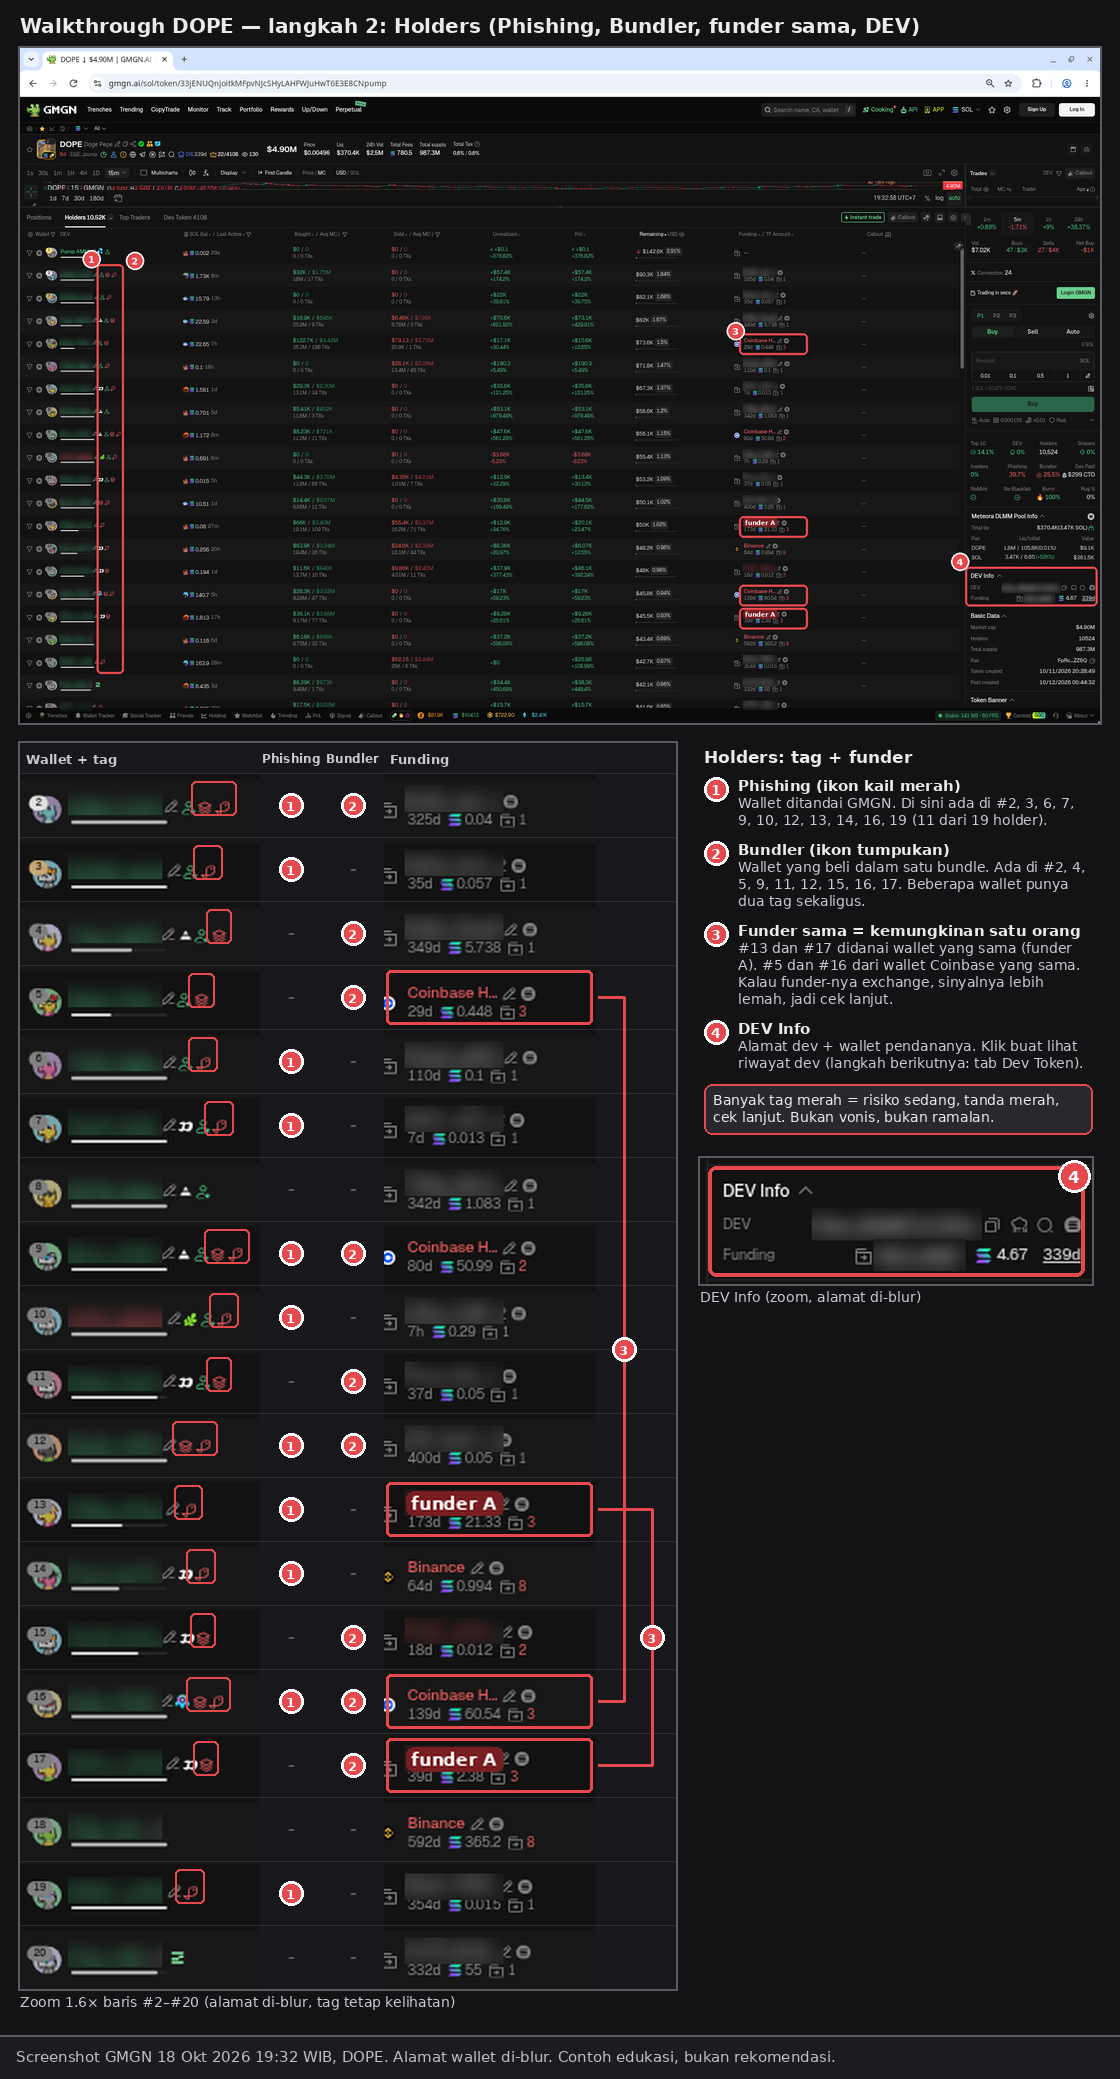
- ① The Phishing tag (red hook, lesson 2.13) is on 11 of the 19 visible holders (#2 to #20).
- ② The Bundler tag (lesson 2.8) is on 9 holders. Some wallets have both tags at once.
- ③ Same funder (lesson 2.6): #13 and #17 were funded by the same wallet ("funder A"). #5 and #16 were funded by the same Coinbase wallet. A funder that's an exchange is a weaker signal, because lots of people withdraw from the same exchange.
- ④ DEV Info: the dev's address and its . From here, move on to the dev's history (Step 5).
Step 3: Bubblemaps
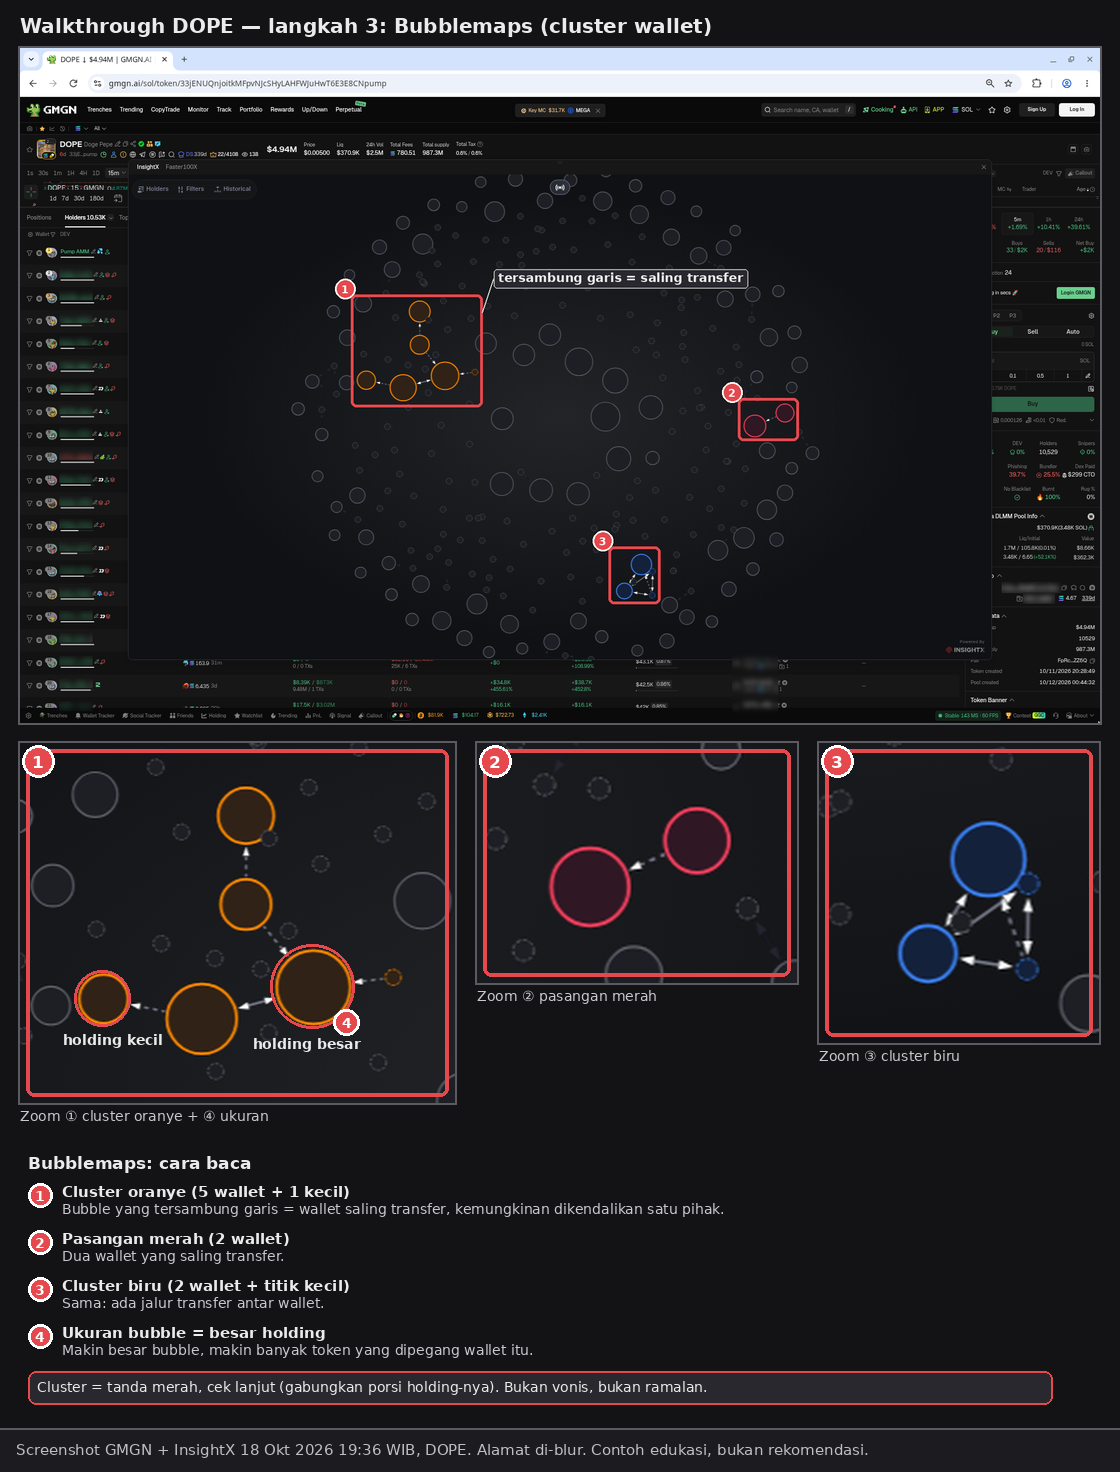
- There are 3 clusters that have transferred to each other (lesson 2.9): ① an orange cluster (5 wallets + 1 small one), ② a red pair (2 wallets), ③ a blue cluster (2 wallets + a small dot).
- ④ Bubble size = holding size. The bigger the bubble, the more tokens that wallet holds.
- A cluster isn't necessarily one person, but still add up its share and ask: "if this cluster sells together, am I ready for that?"
Step 4: The Earliest Trades
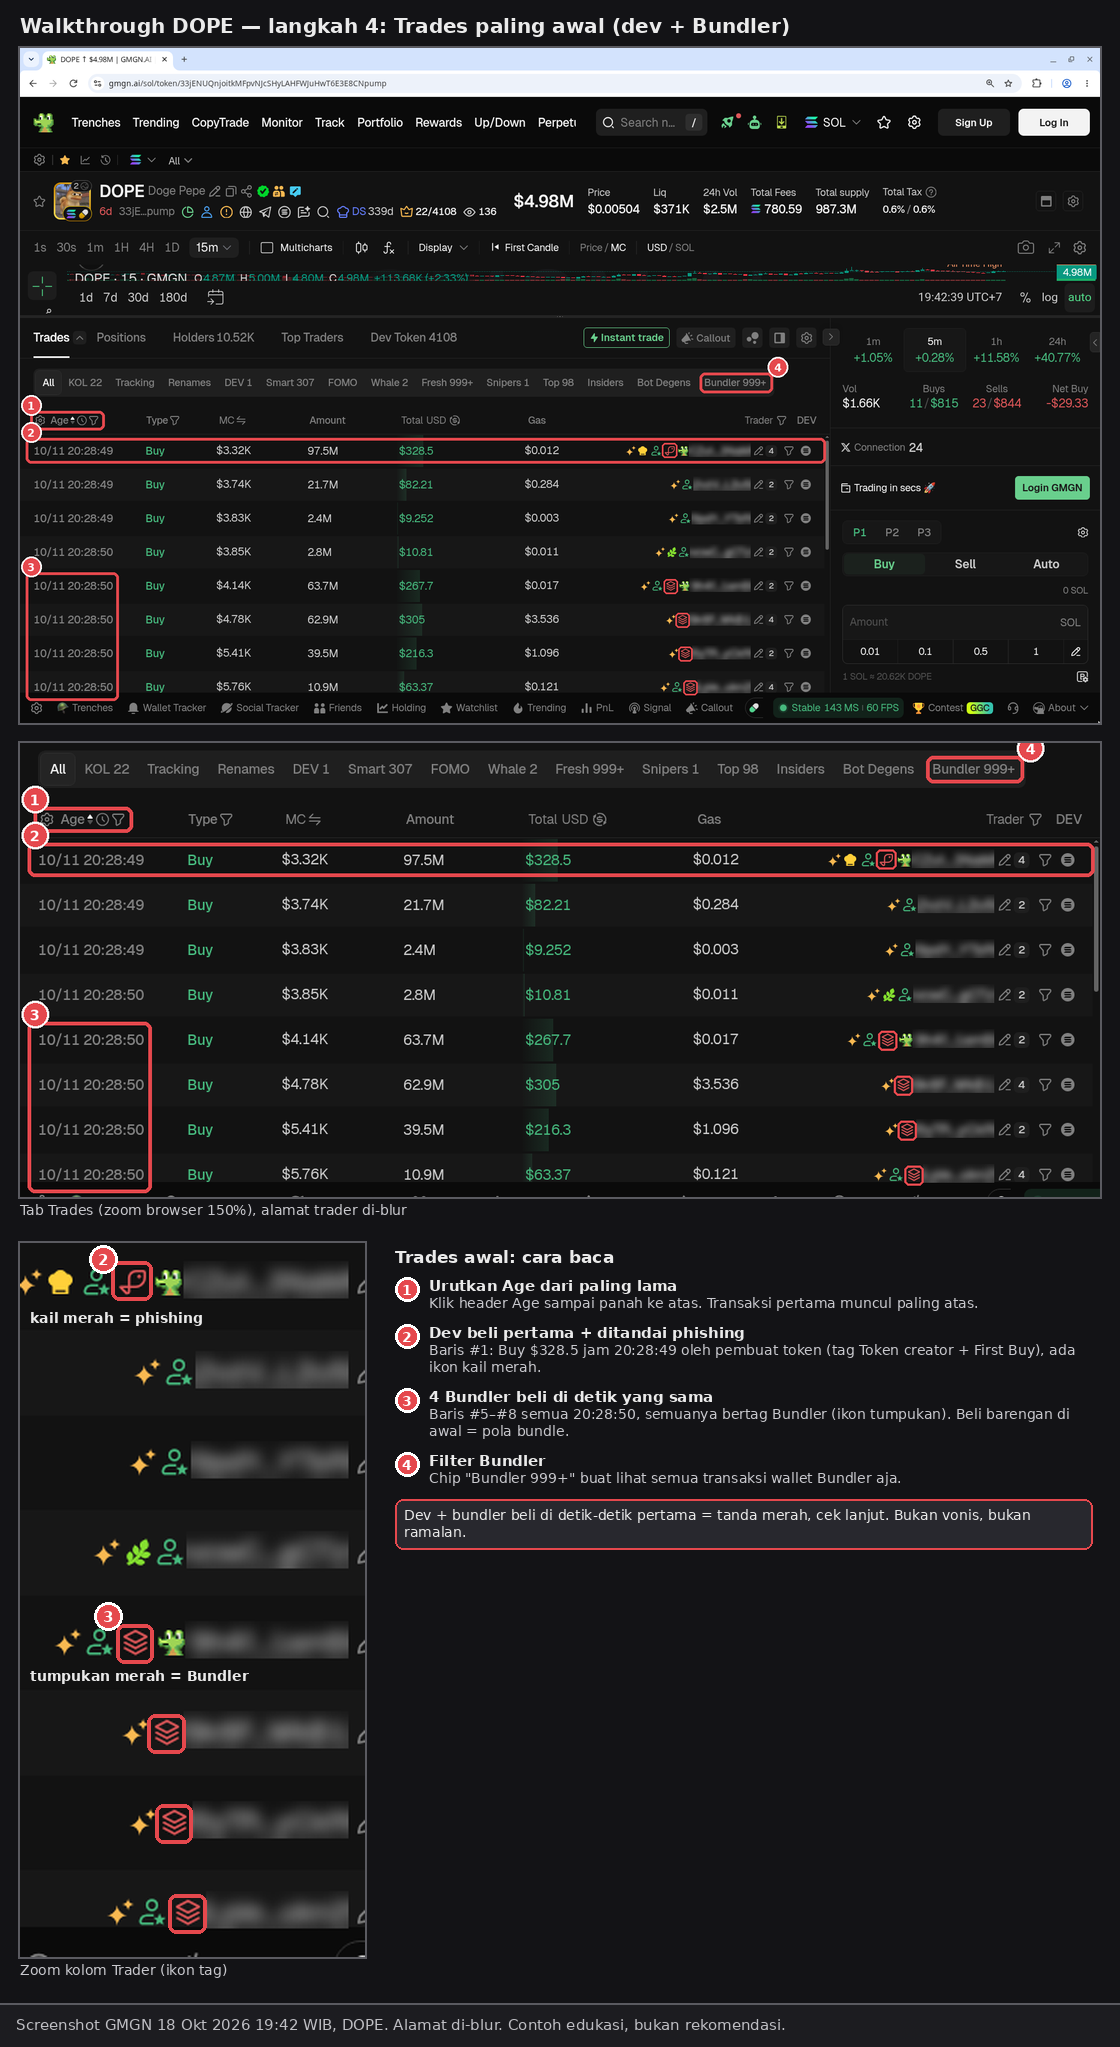
- ① Click the Age header so the oldest transactions are at the top (lesson 2.8).
- ② First row: the dev's first buy (tags Token creator + First Buy) on 10/11 at 20:28:49 GMGN time, Buy $328.5. This dev wallet is also marked with a red hook (phishing).
- ③ One second later (20:28:50), 4 Bundler wallets bought in the same second (rows #5 to #8).
- ④ Click the Bundler 999+ filter chip to see all transactions by Bundler wallets.
A dev and bundlers buying in the first seconds = a bundle pattern. This lines up with the 25.5% Bundler number in Step 1.
Step 5: Dev Token Tab
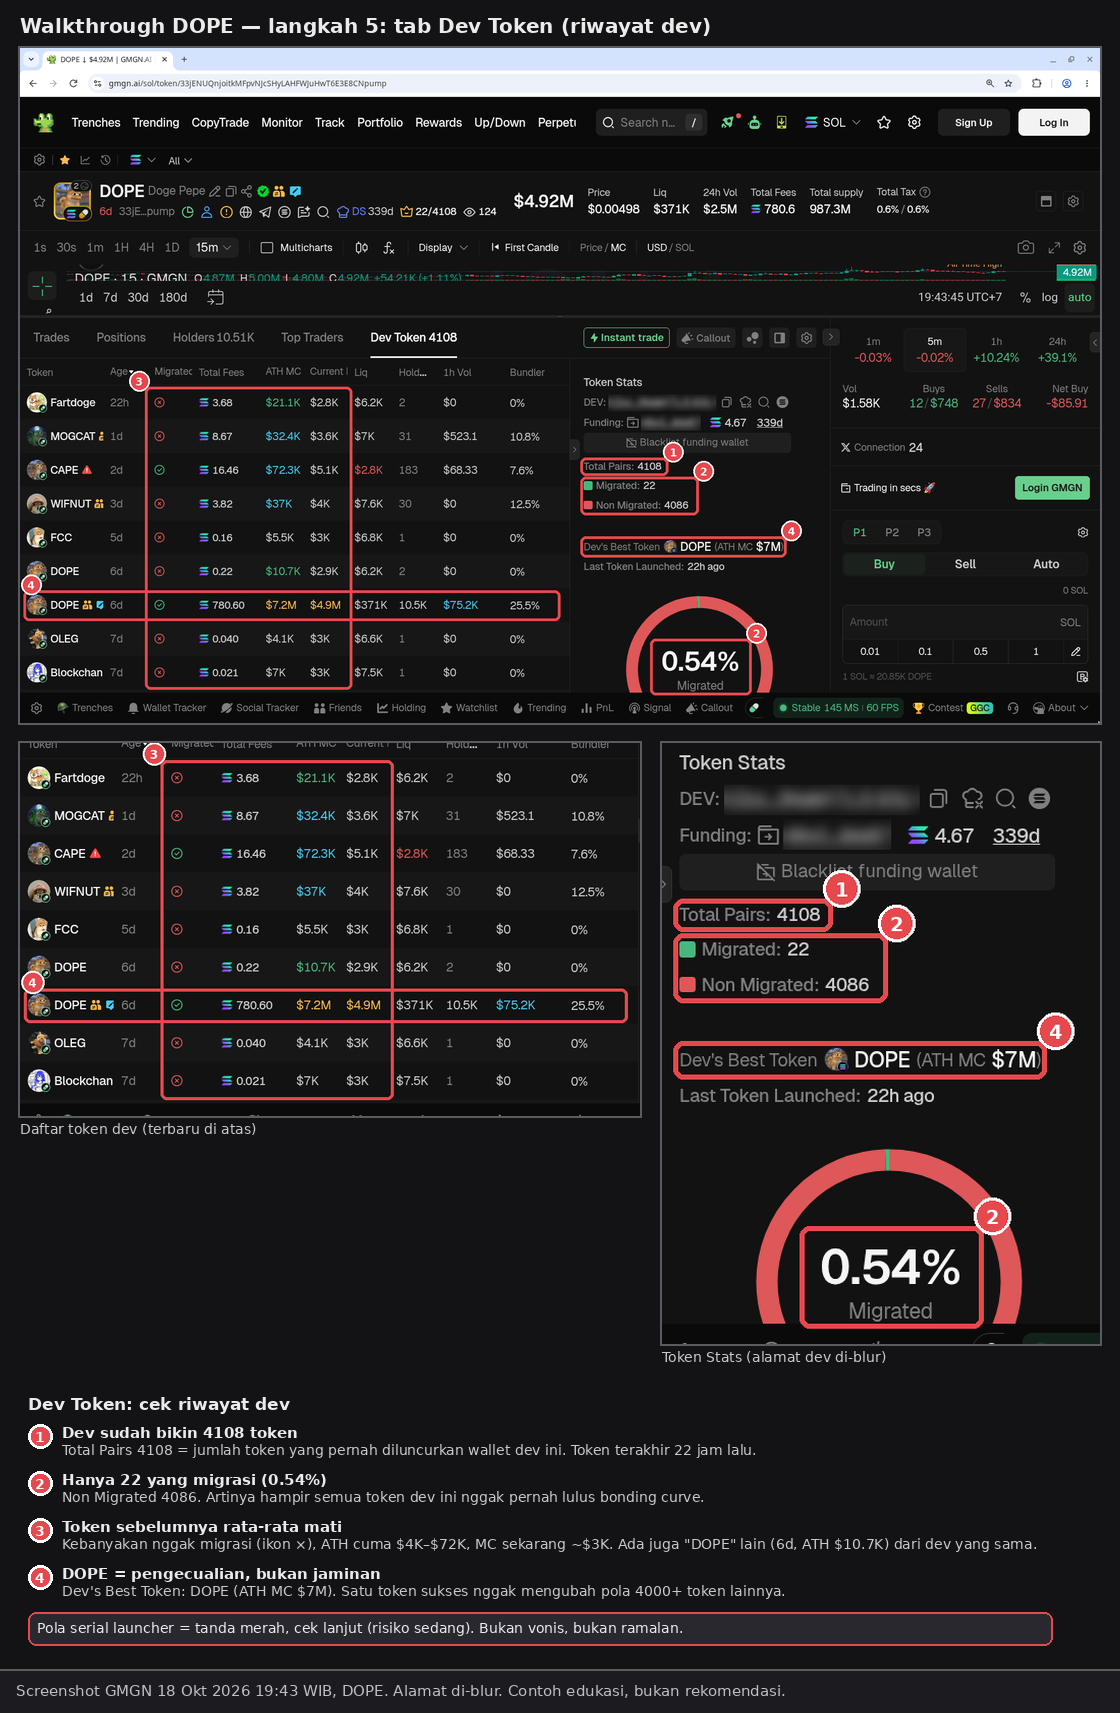
- ① This dev has created 4,108 tokens (Total Pairs).
- ② Only 22 migrated (Non Migrated 4,086), or 0.54% (lesson 2.5).
- ③ Most of the previous tokens never migrated, with ATHs of about $4K to $72K.
- ④ Dev's Best Token = this DOPE itself (ATH MC $7M). One successful token doesn't change the pattern of the other 4,000+ tokens.
A serial launcher pattern like this = higher risk, not a price prediction.
DOPE Conclusion: How Do You Weigh It?
| Side | Findings | Risk |
|---|---|---|
| Contract | NoMint, No Blacklist, Burnt 100% | Low |
| Total Fee vs MC | 780.28 SOL vs a guide of about 487 SOL | Reasonable |
| Distribution | Bundler 25.5%, Phishing 39.6%, lots of tags in Holders, same funders, 3 clusters, the dev + bundlers buying in the first seconds | Medium/high |
| Dev | 4,108 tokens, only 0.54% migrated | Higher |
Our conclusion: the contract is clean, but the risk is medium/high on the distribution side. If you still want in, here's how to weigh it:
- A smaller position size than usual (lesson 3.10). Illustration (made-up numbers): if you usually put 5% of your money per trade, 2 to 3% is enough on a token like this.
- A clear exit before (lesson 3.9): write down your level and target first.
- Watch the Bundler and Phishing wallets with the Bundler filter in the Trades tab. If they start selling together, that's your reason to exit according to plan (lesson 2.12).
- Or skip. That's a valid decision too.
Summary
- A one-token walkthrough = running the lesson 2.14 checklist in order: metrics card → Holders → Bubblemaps → earliest Trades → Dev Token.
- DOPE: a clean contract and a reasonable Total Fee, but the Bundler, Phishing, clusters, and dev history make the risk medium/high on the distribution side.
- Use the results to decide your position size and exit, not to predict the price. Tokens with red flags can still pump, and mostly green tokens can still (lesson 2.16).
Common mistakes
- Stopping at the metrics card, when many signs only show up in the Holders, Trades, and Dev Token tabs.
- Treating DOPE's pump as proof that red flags can be ignored.
- Treating a funder that's an exchange (for example Coinbase) the same as a shared personal-wallet funder. The signal is weaker.
A busy token easily gets your greed going. Go through the steps one by one, look for the smallest possible risk, and don't go in big just because the chart is green.
Next up, lesson 2.16: Low Risk but Still Dumped (HeyGrok).
Not financial advice.
Progress is saved in this browser.