
Chapter 2 · Basics: Check a Token Before You BuyLesson 14 of 16
2.14
1-Minute Checklist Before Entry
± 6 min read 7 sections 1 image
All the Basic checks, summed up as a quick checklist before .
No single indicator is absolute. This checklist is meant to minimize , not to find tokens that will . A red metric doesn't mean a token is bad or can't go up, and all green isn't a guarantee it will go up or that the risk is small. Look at the big picture and manage your risk.
Check flowCheck a token in 4 steps
- 1Contract safety
Anything red? Skip and move on to another token.
- 2distribution
Big or holdings? Size down or skip.
- 3, chart & socials
Fee far below the guide or a chart that's too neat? Be careful.
- 4Position plan
Decide your position size, , and . Then click Buy.

Section 1 / 7
Before you start
- The right , from an official source (not from DMs or comments). (lesson 1.4, Account Security)
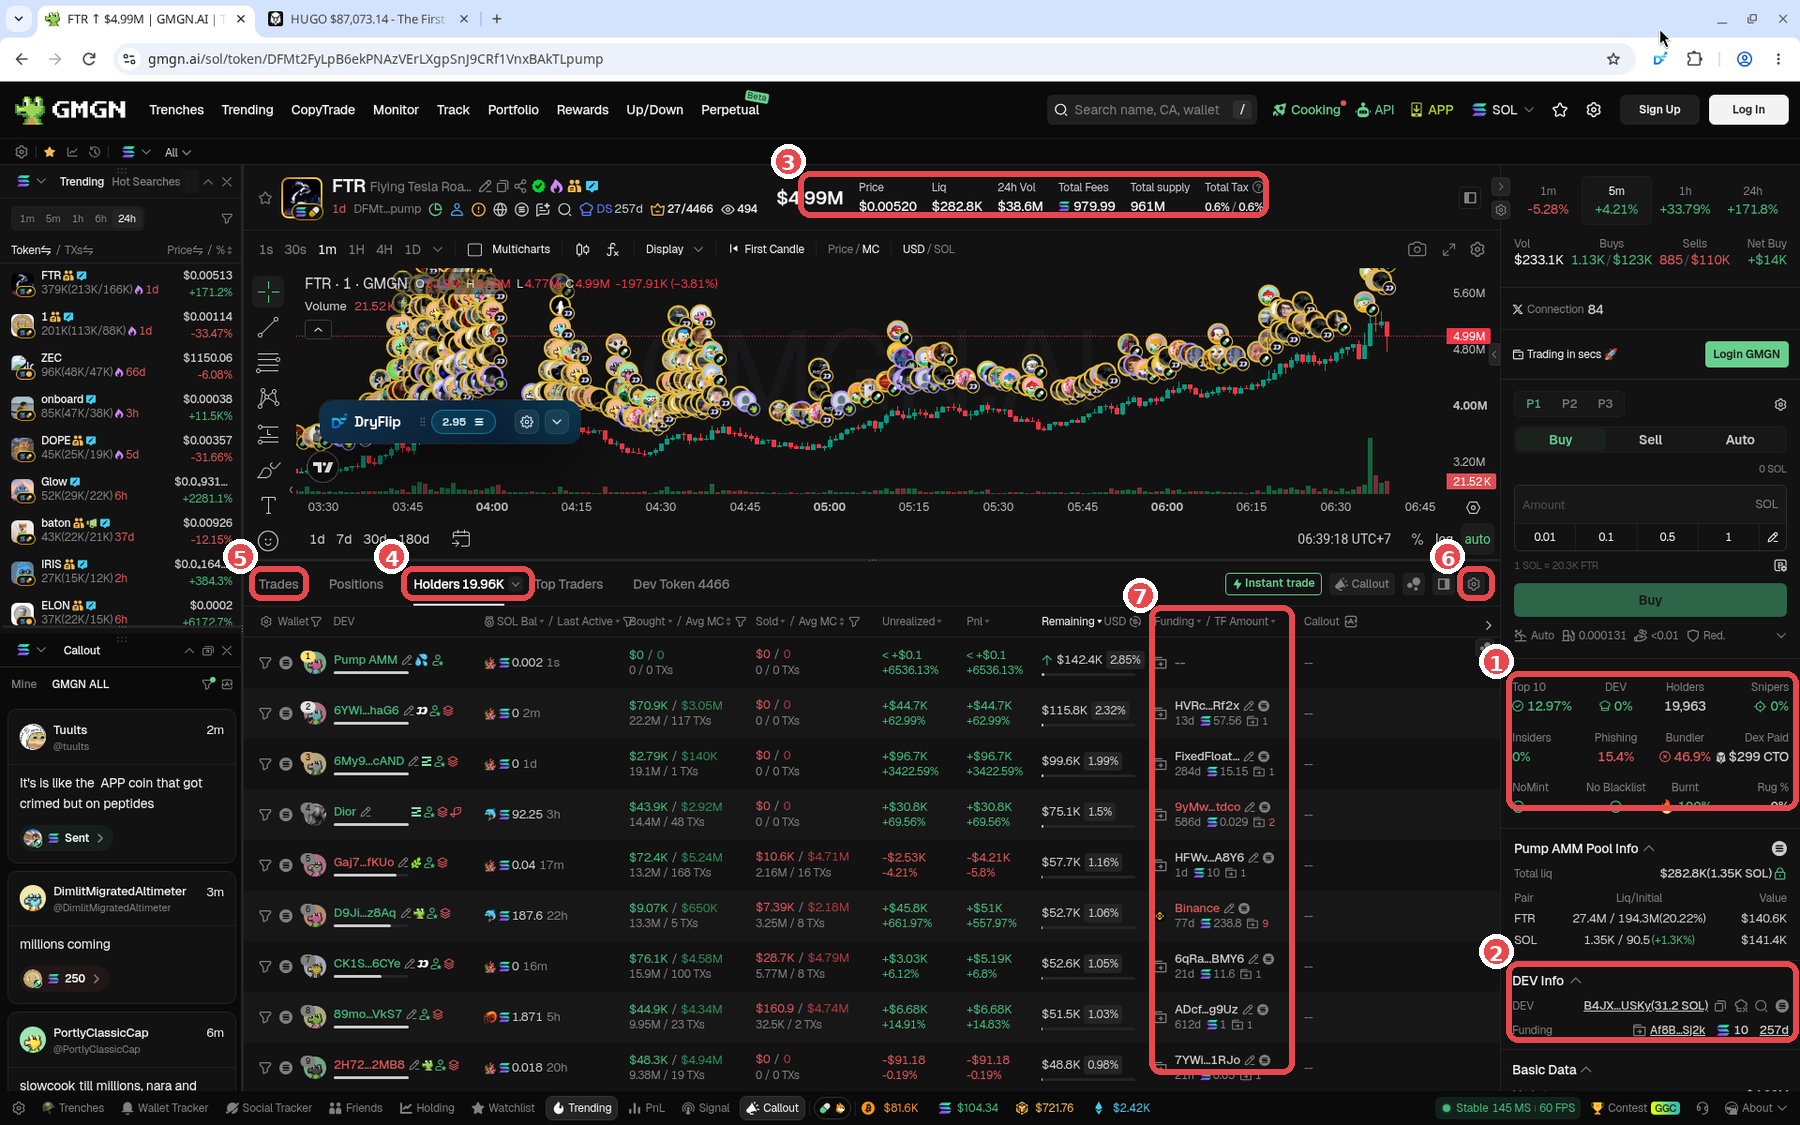
- Open the token on GMGN. Almost all the data is on one page. The numbers ① to ⑦ in the Where (GMGN) column of the tables below = the numbers on the token page map: ① metrics card, ② Info, ③ Total Fees / header, ④ Holders tab, ⑤ Trades tab, ⑥ Bubble icon, ⑦ Funding / column.
Section 2 / 7
Contract safety (red = usually an instant skip)
| Check | Where (GMGN) | Lower risk | Be careful | Lesson |
|---|---|---|---|---|
| ① Token metrics card (NoMint) | Green: the dev can't mint new coins | Red: the dev can still mint and then | 2.1 | |
| ① Metrics card (No ) | Green: your can't be frozen | Red: it can be frozen, and you can't sell () | 2.2 | |
| ① Metrics card (Burnt) | 100%. pump.fun tokens: still on the = no LP yet (funds are in the bonding curve); bonded = LP burned automatically | Low: the dev can pull from the pool | 2.3 |
Section 3 / 7
Holder distribution
| Check | Where (GMGN) | Lower risk | Be careful | Lesson |
|---|---|---|---|---|
| ① Metrics card (Top 10), double-check in the ④ Holders tab | Below 30% (the course's guide), varied holders | Above 30% is riskier, but not an absolute rule | 2.4 | |
| ① DEV + ② DEV Info | Small DEV %, clean dev history | The dev often does Sell All / Transferred. A dev sell on a meme coin usually isn't a big deal; on a tech coin it's more often a red flag | 2.5 | |
| ⑦ Funding / TF Amount column, far right of the ④ Holders tab | Varied sources, different times, funded long ago | Lots of top holders from the same wallet, almost the same time, similar amounts | 2.6 | |
| ① Metrics card () + labels in the ④ Holders tab | A small share, or already exited | A big share, still holding, one funding source. Lots of snipers doesn't always mean danger | 2.7 | |
| ① Metrics card () + ⑤ Trades tab | Small, or still holding and holding the floor | Big and still holding; same timing, fees, and amounts in the Trades tab. The number can be inflated (bots in the same block), so /Funding | 2.8 | |
| ⑥ Bubble icon in the tab row | Small clusters, mostly gray | Rough estimate: clusters at 5 to 10% be careful, above 10% high risk. Ask: "if this cluster sells everything, am I ready for that?" A cluster isn't necessarily one person (having transferred to each other ≠ one owner), so cross-check Funding | 2.9 | |
| ① Metrics card (, ) | Small | Big : lots of in wallets that got the token through transfers, not buys. Cross-check Bubblemaps, Bundler, Funding | 2.13 |
Section 4 / 7
Volume & chart
| Check | Where (GMGN) | Lower risk | Be careful | Lesson |
|---|---|---|---|---|
| ③ Token header (Total Fees / F icon) | Around 1:10,000 or more (the course's guide) | Far below the guide. Exception: new pairs with heavy volume in the first few minutes | 2.10 | |
| The token chart | Normal ups and downs, with pullbacks | Climbing like a staircase or too neatly = suspect fake volume () | 2.12 |
Section 5 / 7
Socials
| Check | Where (GMGN) | Lower risk | Be careful | Lesson |
|---|---|---|---|---|
| ① Metrics card () | The DexScreener profile has been paid for | Not yet. Remember: Paid is only a paid profile, no guarantee the risk is small | 2.11 | |
| Social links in the token header | Real, active accounts, and the CA matches the officially shared one | New/empty accounts, "guaranteed 100x" promises, a different CA | 2.11 |
Section 6 / 7
Quick order
Summary
Summary
Summary
- Quick order: contract safety first (red = high risk, usually skip), then holder distribution, then , the chart, and socials.
- Decide your position size, take profit, and cut loss before you click Buy (lesson 3.3, RR matters more than ).
- The 30%, 1:10,000, and cluster numbers are the course's guides, not hard rules. Even a low-risk checklist result is no guarantee of profit, but this checklist keeps you out of a lot of traps.
Section 7 / 7
Common mistakes
- Skipping steps because you're afraid of missing out.
- Carrying on even though something in contract safety is already red.
- Clicking Buy first, and only then thinking about when to take profit and cut loss.
- Treating the checklist result as a price prediction. Red doesn't mean it will definitely fail to pump, and all green can still dump.
Next up, lesson 2.15: Walkthrough: Checking 1 Token from Start to Finish (DOPE).
Not financial advice.
Practice: How Risky Is It?8 sample token profiles · rate their risk level with this checklist
→Progress is saved in this browser.